

Part 2
Admin Domain – Blog Back-Office
The objective of this chapter is to create your blog's back-office to manage all the articles that will appear on this blog.
We will start by creating the visual appearance of this back-office (header, footer, article listing page and finally article creation/editing page).
At the end of this chapter you will have a blog back-office like this:
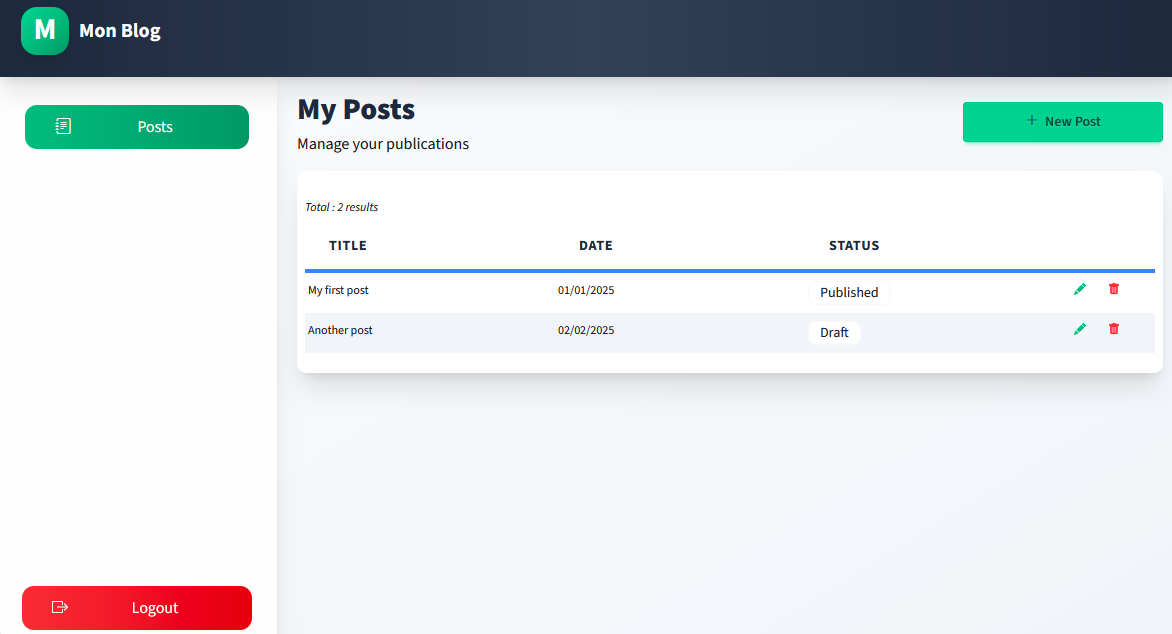
Desktop Version
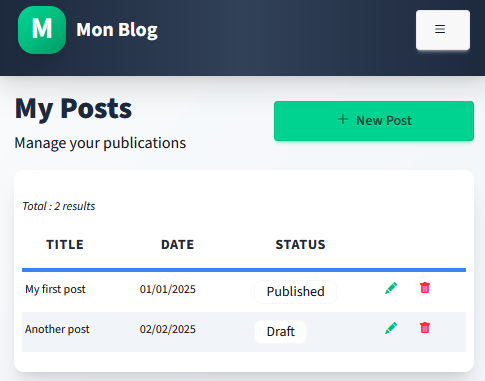
Mobile Version
🔗 Go to your blog's admin page: https://admin.myblog.fr/bweb
Then in the left menu click on "My Domains" then on "admin.myblog.fr"
In the General tab we will select:
- Template type: check the second template: Header/Footer between side bars
- Template composition: check Header and Left Sidebar
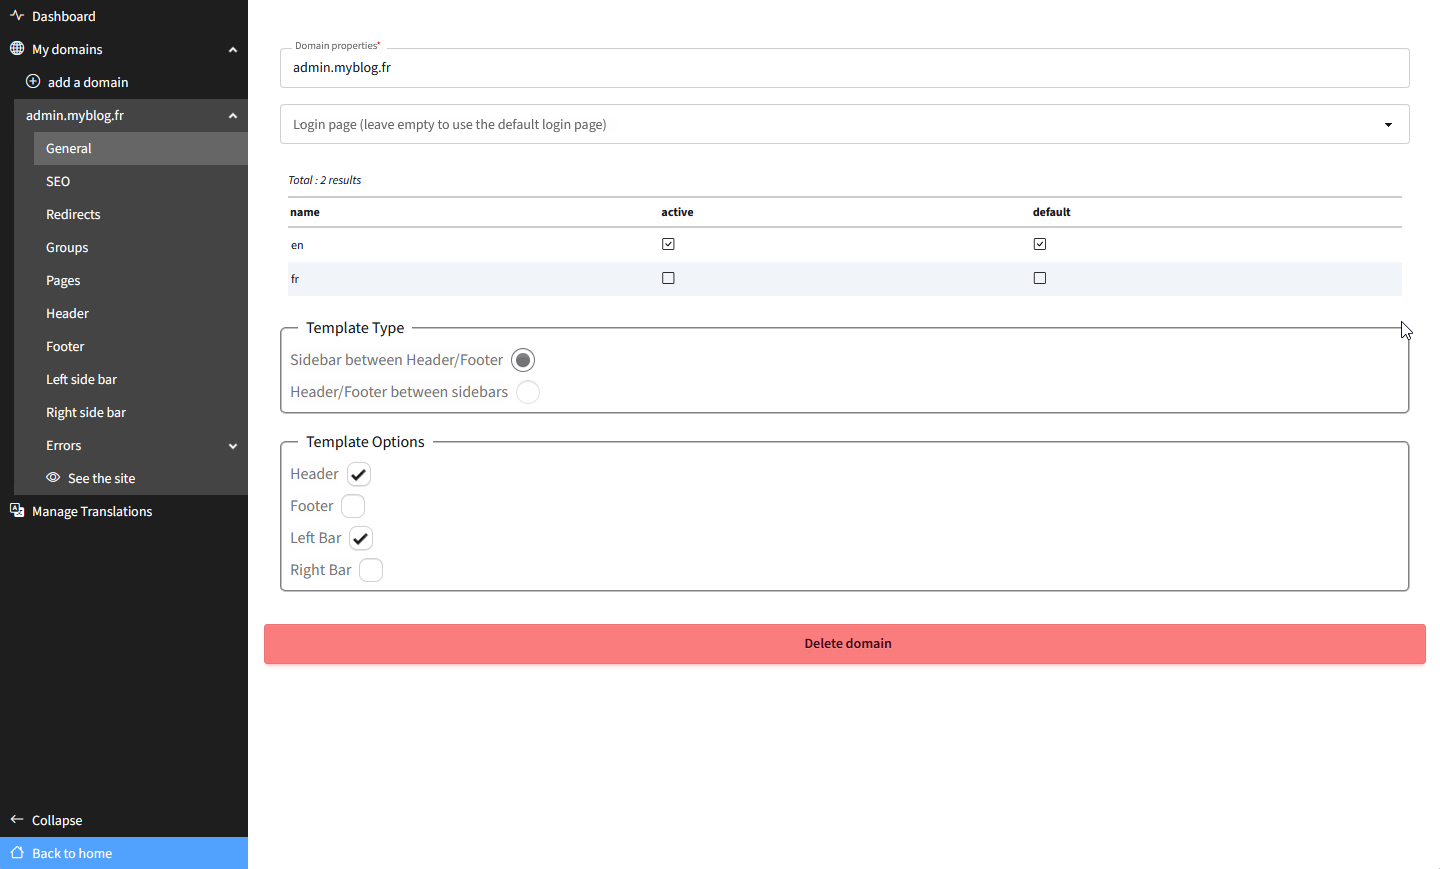
Domain Properties
The next step will be to visually create the rendering of this header and left menu.
2.1 Creating the Header

🖥️ Desktop Version

📱 Mobile Version
- Click on the "Header" tab to open the visual editor for your Header
-
In the top right corner you see the
 button which allows you to open the dev-panel. Once open, activate the first 4 buttons on the right side to keep the dev-panel always open:
-
From the object list, select Container and drag it onto your render window then configure it as follows:
From the dev-panel we have defined:
- • A minimum height of 80px for this header
- • Padding of 24px on the right and left
- • A background color with a gradient
- • A shadow (by directly entering the Tailwind CSS class but you could also have done it from the "shadow" tab in the dev panel)
-
Now let's add the button and title to display the navigation banner on the mobile version:
We have therefore:
- • Added a button and title for the mobile version of the back-office
- • Added the hidden class to the "button of mobile menu" for LG screens
The mobile menu button uses a responsive breakpoint system: it is visible by default on small screens (mobile and tablets), but automatically becomes invisible on large screens (from 1024px width) thanks to the hidden class applied on the LG breakpoint.
This adaptive behavior provides appropriate navigation based on the user's screen size.
Tailwind CSS Default Breakpoints:
| Prefix | Size | Affected Devices |
|---|---|---|
| Default | 0px and up | All screens (mobile first) |
| sm: | 640px and up | Landscape smartphones, small tablets |
| md: | 768px and up | Portrait tablets |
| lg: | 1024px and up | Landscape tablets, small laptops |
| xl: | 1280px and up | Laptops, desktop screens |
| 2xl: | 1536px and up | Large desktop screens |
Then we have:
- • Added the hidden class to the "mobile buttons" container which makes this container hidden by default regardless of screen size.
- • Added an onclick event on the mobile menu button to make it appear/disappear with each click.
- • This event was placed in the Default breakpoint but since the button is invisible from LG, there is no need to do more. The action will only be triggered between SM and MD.
2.2 Creating the Left Sidebar
Click on the "Left Sidebar" tab to open the visual editor for your left menu:
By adding the hidden class to the main "left side bar" container, it is hidden by default and the addition of the flex class on the LG breakpoint displays it for screens with a resolution greater than 1024px.
💡 You will have noted that the menu buttons having already been created for the mobile menu header, we just had to copy/paste these blocks.
2.3 Creating the Article Listing Page
From the administration page, access the Pages menu, then click on Home (which is the home page and the only current page of your application) and modify its content as follows:
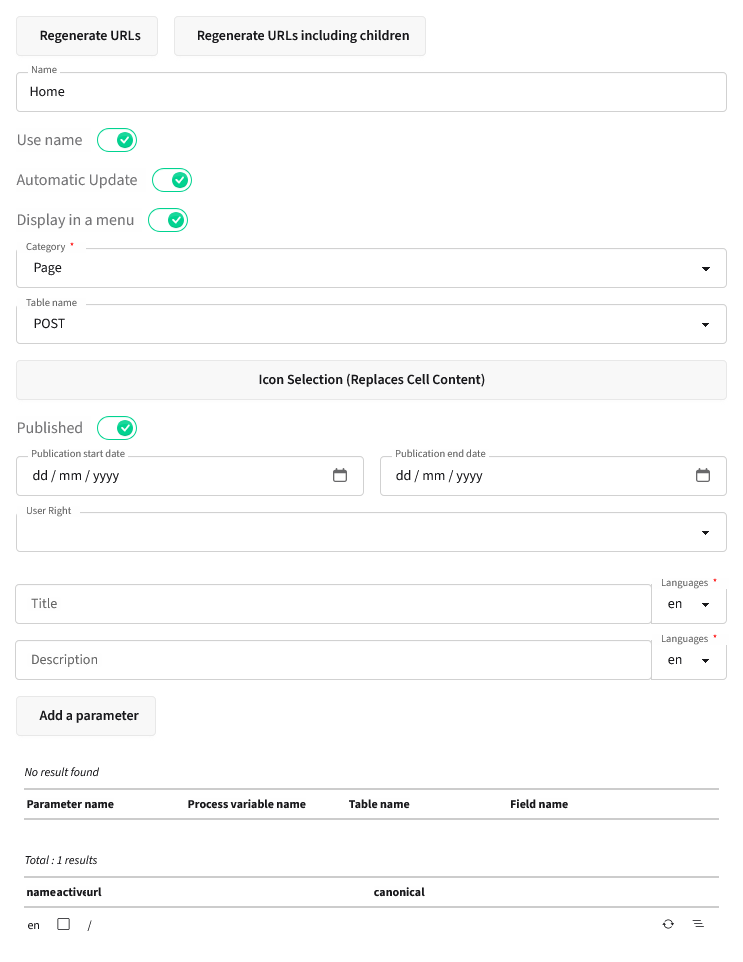
Page Configuration
Now click on the "View Site" link to access your application, you will see the header and left menu we created previously as well as the default page generated during BWEB installation.
⚠️ We are going to start by deleting everything
2.3.1 Header
We will start by creating the upper banner of this article listing page to get a result like this:

Upper Banner of Listing Page
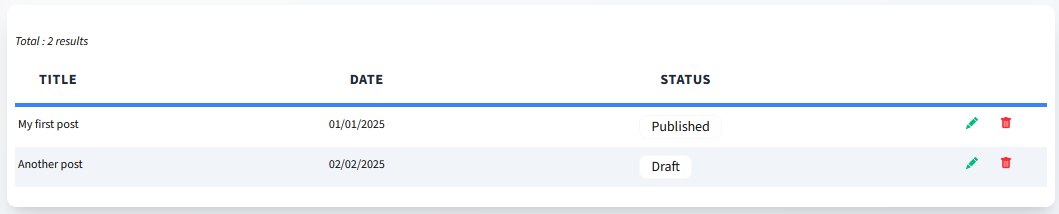
2.3.2 Posts Listing
Now we will add the table that lists all the blog articles to achieve this result:
Article Listing Table
We very simply mapped our POST table with our listbox.
📹 At 01:48 of the video - The formula for the Status column value is:
This.isPublished?" Published":"Draft"
The formula for the CSS class of the span is:
This.isPublished?"badge badge-soft badge-success":"badge badge-soft badge-info"
⚠️ For now the buttons to add, edit and delete a post are not active, we will return to this later in this QuickStart.
💡 Optionally, as you saw in the video, to deeply style these tables you can add a code block and include custom CSS styles.
New options will be added in future versions of BWEB to avoid adding code, but you know that for any particular presentation that BWEB doesn't allow you to do, this code area is available, with basic CSS learning (or with the help of an AI of course).
Example of custom CSS:
<style>
    .labelgroup {
        border-top: 0 !important;
        border-bottom: 0 !important;
    }
    .labelgroup label {
        display: flex;
        align-items: center;
        gap: 0.5rem;
        padding: 1rem 1.5rem;
        font-size: 0.875rem;
        font-weight: 700;
        color: #1f2937;
        background-color: #ffffff;
        border-bottom: 4px solid #3b82f6;
    }
    .labelgroup label span {
        text-transform: uppercase;
        letter-spacing: 0.05em;
    }
</style>
2.4 Creating the Article Editing Page
2.4.1 Header
We are not really going to create a new page, but we will contextualize the operation of the listing page.
By default this page will display the table of Posts created previously and when you click on the Add Post button or on the edit pencil of a post, the following actions will be executed:
- • Hiding elements from the listing page (title + listbox)
- • Displaying the Post editing form
In this first part we will create the header of the editing page as follows and then add the contextualization functions:
The edit-main-content container is hidden by default since we added a condition to make it visible:
(Entity#null) || (vo_selectedItemData#null)If Entity which references the POSTEntity object being worked on or vo_selectedItemData which represents the currently selected table row are both null then the edit-main-content container is hidden.
We also added 2 actions on the onclick event of the Add Post button and the edit pencil:
-
•
renderFunction -> hideblock : all functions of the renderFunction class are executed client-side (browser) in javascript and allow you to display or hide a block, display an alert, reload a listbox...In this case we selected the hideblock function and then indicated the block to hide, namely listing-main-content
-
•
The second step is to display the edit-main-content block which is hidden by default. This block requires a server call to retrieve POST information, so we cannot use a renderFunction. In this case we call the WebFormController class and its loadBlockWithSelectedItem function which will allow us to reload the entire edit-main-content block by first retrieving the POSTEntity
2.4.2 POST Editing Form
Integration of a "Quill" Rich Editor
BWEB does not yet include a default Rich editor component but you have the ability to add your own javascript through the code object, css and also include external javascript libraries.
In this QuickStart we have added Quill which is a very easy-to-use Rich Editor.
📚 You can find the complete Quill documentation here: https://quilljs.com/docs/quickstart
The first code block titled "quill integration" includes the Quill library and slightly configures the rendering:
<link href="https://cdn.quilljs.com/1.3.6/quill.snow.css" rel="stylesheet">
<script src="https://cdn.quilljs.com/1.3.6/quill.js"></script>
<style>
.ql-container {
    height: 300px;
}
.ql-editor {
    min-height: 200px;
    width: 100%;
}
body:has(input[name="content"].error) #quill-content {
    border: 1px solid red !important;
}
</style>
The second code block titled "quill loading" creates the rich Editor on our quill-content container and configures the elements of its menu bar.
<script>
var quill = new Quill('#quill-content', {
    theme: 'snow',
    modules: {
        toolbar: [
            ['bold', 'italic', 'underline', 'strike'],
            [{ 'color': [] }, { 'background': [] }],
            [{ 'header': [1, 2, 3, 4, 5, 6, false] }],
            [{ 'size': ['small', false, 'large', 'huge'] }],
            [{ 'font': [] }],
            [{ 'align': [] }],
            [{ 'list': 'ordered'}, { 'list': 'bullet' }],
            [{ 'indent': '-1'}, { 'indent': '+1' }],
            ['blockquote', 'code-block'],
            [{ 'script': 'sub'}, { 'script': 'super' }],
            ['link'],
            ['clean']
        ]
    }
});
contentInput = document.querySelector('input[name="content"]');
if (contentInput.value.trim().length > 0) {
    quill.root.innerHTML = contentInput.value;
}
quill.on('text-change', () => {
    const isEmpty = quill.getText().trim().length === 0;
    contentInput.value = isEmpty ? '' : quill.root.innerHTML;
});
</script>
It also allows synchronization of the hidden input field with Quill.
Conditional Display of POST Image
In the video you could see that we contextualize the display of the current blog image. In creation mode when there is no image yet this container is hidden and it appears when an image has already been saved.
To do this, we completed the "Conditional Display" tab as follows:
((Entity#null) && (Entity.imageName#null)) && (Entity.imageName#"")If the current POST (stored in the Entity variable) is not null and has an image then the block is displayed and otherwise we selected the "Not loaded" effect so the container will not be loaded at all (we could also simply hide it by choosing "Hide block")
Link to POST Image
BWEB does not yet have a default object to display a dynamic image (from the database) but this is not a problem, by adding a code object (here called "image link code") we can add our dynamic link to the image:
<img src="/images/post-<!--#4DTEXT Entity.uuidKey--> : Indéfinie/<!--#4DTEXT Entity.imageName--> : Indéfinie"
class="w-48 h-36 object-cover rounded-lg">💡 We will see in the next chapter that when saving the POST, we save the image in a folder images/post-[POST UUID]/[Image file name]
2.4.3 Saving the POST
We will code this save function in our POST class and then map this function to the Save button.
In 4D, open the POST dataclass and add the save function:
Function save($vo_POST : Object)->$vo_WebResponse : cs.bspkComponent.WebFormController
    /* parameters
        vt_DetailUuid:select:getBlocsNameCollection:["wrapper"]:tomSelect:label:block detail
        vt_SendAllObjectsOfBlocName:hidden:vt_DetailUuid
    */
    /*
The commented lines above are mandatory, their purpose is to indicate which elements of the page will be
transmitted when the form is submitted (when clicking the save button) This will add a selection list in the dev panel in
the configuration  of the button's click event to allow us to select a container whose included form elements will all be transmitted
    */
For now this function does nothing, we will complete it later.
💡 For the dev panel to see this new function you must restart 4D or execute the BSPK_REFRESH_STORAGE method.
Now go back to your page, we will associate clicking the Save button with this new function:
As you could see, now the button click launches the save function but first BWEB automatically checks the required fields and in our case the title, summary and content fields are empty so a warning appears.
We can now complete the save function:
// Are we creating or editing?
If ($vo_POST.pk=Null)
    $Post:=This.new()
Else
    $Post:=This.get($vo_POST.pk)
End if

$Post.title:=$vo_POST.vt_FieldValue.title
$Post.summary:=$vo_POST.vt_FieldValue.summary
$Post.content:=$vo_POST.vt_FieldValue.content
$Post.publicationDate:=$vo_POST.vt_FieldValue.date
$Post.isPublished:=($vo_POST.vt_FieldValue.status="Published")

//cleaning of the title to become a slug
//not the most efficient and complete way but it's only a quickstart :-)
$Post.slug:=Lowercase(Uppercase($vo_POST.vt_FieldValue.title))
$Post.slug:=Replace string($Post.slug; " "; "-")
$Post.slug:=Replace string($Post.slug; "'"; "-")
$Post.slug:=Replace string($Post.slug; "!"; "-")
$Post.slug:=Replace string($Post.slug; "?"; "-")
$Post.save()

//saving the image
$vt_ImageFolder:=Get 4D folder(Database folder)+"BWEB"+Folder separator+"images"+Folder separator+"post-"+$Post.uuidKey
If (Test path name($vt_ImageFolder)#Is a folder)
    CREATE FOLDER($vt_ImageFolder;*)
End if

If ($vo_POST.vt_FieldValue.image#"")
    $vo_Blob:=BSPK_BASE64_TO_BLOB(JSON Parse($vo_POST.vt_FieldValue.image))
    $vt_ImageName:="small"+String(Milliseconds)+".jpg"
    BLOB TO DOCUMENT($vt_ImageFolder+Folder separator+$vt_ImageName; OB Values($vo_Blob)[0])
    $Post.imageName:=$vt_ImageName
    $Post.save()
End if

//response : in this case return to the root page
$vo_WebResponse:=cs.bspkComponent.WebFormController.new()
$vo_WebResponse.vc_Action.push({vt_Action: "redirect"; vt_Url: "/"})
✅ And that's it! POST saving is complete!!
Now let’s see the result in action. Fill out the form with the information of an article, upload an image, and save the post:
2.4.4 Deleting the POST
On the same principle we will develop the delete function and then connect it to the delete buttons:
Function delete($vo_POST : Object)->$vo_WebResponse : cs.bspkComponent.WebFormController
    //are we deleting from the detail of the post or from the trash icon in the listbox?
    //If the Entity process variable is set, we are in the detail page
    If (Entity#Null)
        $Post:=Entity
    Else
        //if we are deleting the post from the listbox directly, we can use the $vo_POST.triggerObject.vt_RowPk to get the id of the POST
        $Post:=This.get($vo_POST.triggerObject.vt_RowPk)
    End if
    //delete the image folder and file
    $vt_ImageFolder:=Get 4D folder(Database folder)+"BWEB"+Folder separator+"images"+Folder separator+"post-"+$Post.uuidKey
    If (Test path name($vt_ImageFolder)=Is a folder)
        DELETE FOLDER($vt_ImageFolder; Delete with contents)
    End if
    $Post.drop()
    //response
    $vo_WebResponse:=cs.bspkComponent.WebFormController.new()
    If (Entity#Null)
        //we are deleting from the detail page
        //we add 2 actions :
        // - changeUrl to remove the pk parameter
        // - openAlert to open a toast alert to confirm the delete of the post
        $vo_WebResponse.vc_Action.push({vt_Action: "changeUrl"; vc_ArgumentToChange: New collection({name: "pk"; value: ""})})
        $vo_WebResponse.vc_Action.push({vt_Action: "openAlert"; vt_AlertTitle: ""; vt_AlertMessage: "Post deleted !!"; vt_AlertType: "success"; vl_AlertDuration: 3})
        //and we reload the mainContent block (the entire page)
        $vo_WebResponse.reloadBlock("mainContent")
    Else
        //we are deleting the post from the listbox
        //we only add the action openAlert to confirm the delete of the post
        //and the we only reload our listbox of posts
        $vo_WebResponse.vc_Action.push({vt_Action: "openAlert"; vt_AlertTitle: ""; vt_AlertMessage: "Post deleted !!"; vt_AlertType: "success"; vl_AlertDuration: 3})
        $vo_WebResponse.reloadBlock("listbox")
    End if
💡 For the dev panel to see this new function you must restart 4D or execute the BSPK_REFRESH_STORAGE method.
Now we will connect this function to our 2 delete buttons:
You will have noticed that we added a display condition on the delete button of the post detail page so that it only displays if the post is already saved.
Additionally, adding a confirmation message automatically handles the condition to execute the delete.
2.4.5 Deleting the POST Image
On the same principle we will develop the image delete function and then connect it to the image delete button:
Function removePostImage()->$vo_WebResponse : cs.bspkComponent.WebFormController
    //remove the image from the entity
    Entity.imageName:=""
    Entity.save()
    //delete the image folder and file
    $vt_ImageFolder:=Get 4D folder(Database folder)+"BWEB"+Folder separator+"images"+Folder separator+"post-"+Entity.uuidKey
    If (Test path name($vt_ImageFolder)=Is a folder)
        DELETE FOLDER($vt_ImageFolder; Delete with contents)
    End if
    //response
    $vo_WebResponse:=cs.bspkComponent.WebFormController.new()
    $vo_WebResponse.reloadBlock("featured-image")
💡 For the dev panel to see this new function you must restart 4D or execute the BSPK_REFRESH_STORAGE method.
Now we will connect this function to our delete button:
🎉 That's all folks!!
📚 The rest of our QuickStart with the frontend part in chapter 3 coming soon…
You can verify the final render of your blog backend by clicking the "logout" button. You will then be logged out of the administrator interface and the dev-panel will disappear. You will then navigate as a standard visitor in your application (We do not yet have rights management at this stage. We will see this in part 3).
Need project resources?